

How To Use App Step In Sharepoint Designer 2013
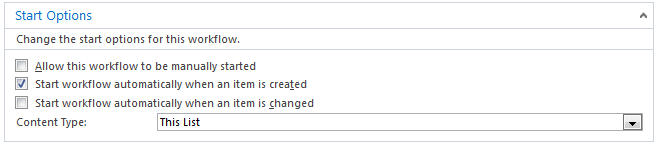
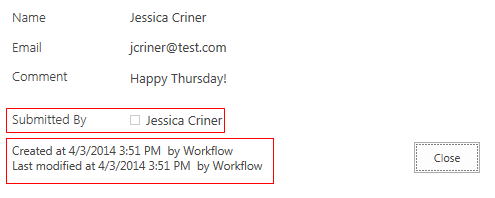
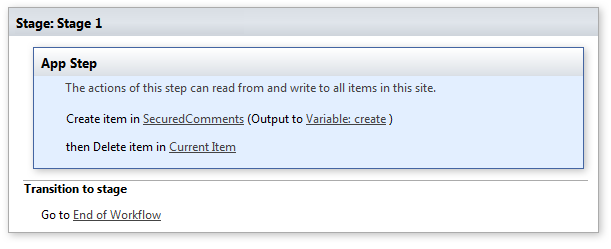
I recently opened SharePoint Designer 2013 with the intent of creating a workflow using an Impersonation Step when I realized this option was missing. After some quick research, I discovered this workflow action had been deprecated in SharePoint Designer 2013. This articlefrom MSDN explains why this action is no longer available for use on the SharePoint 2013 workflow platform, in addition to a list of all other actions that are no longer available. But not to worry! In SharePoint Designer 2013, you can choose the SharePoint 2010 Workflow platform during creation and still have all of those workflow actions available to you. Problem solved! End of blog. Just Kidding! My intent of this blog is to use an example workflow scenario requiring elevated permissions, and walk through step by step how to implement this in SharePoint Designer 2013. I plan to use the new method, which requires you to wrap any actions in your workflow that require elevated permissions in an App Step. Why did I decide on the new method rather than using the Impersonation Step available with the SharePoint 2010 workflow platform? I will get into that as well. But first… A SharePoint Designer workflow will run under the permissions of the user who started the workflow. Certain steps of the workflow may require the user to have more permissions than you intend to grant them. If elevated permissions are not used, the workflow will not work, and you will likely receive an access denied error or the workflow will not execute at all. The use of an App Step resolves this issue. Any actions placed inside an App Step will have Read/Write permissions to all Items in the site, such as site lists (which I will use in my example scenario). You would like users of your intranet site to fill out a form to submit a comment to the site owners. The users should NOT be allowed to view other user's submitted comments . Seems simple enough, right? Well not exactly, although the solution I'm about to propose is actually quite easy. In order for user's to be able to submit a comment, they will need to have Contribute permissions to the list, therefore allowing them to also see other user's comments, which they should not be allowed to view. The solution will require the creation of two custom lists. One list will be the "public" list where users will submit their comments. The other will be a "security controlled" list that only site collection administrators/owners will have access to. We will then create a SharePoint Designer 2013 workflow associated with the public list and set it to start automatically when a list item is created. Once the user submits their comment, the workflow will create the list item in the security controlled list with the use of an App Step, and then delete the item from the public list. 1) Create two Custom Lists: 2) Break permission inheritance on the SecuredComments list and ensure only the needed users have permissions to this list. Make sure all other users have Contribute permissions to the Comments list to ensure they are able to submit the form. 3) Create the columns in your lists. (Example: Name, Email, and Comment). I created an additional column called 'Submitted By' in my Secured Comments list. You'll see why in a bit. 4) If you would like to set your form up to open in a modal dialog from a button click, check out my previous blog explaining how to accomplish this with the use of the Script Editor Web Part: Don't Script in the Wrong Web Part! 5) Next, you will need to activate the 'Workflows can use app permissions' feature in Site Collection Features to allow workflows to read from and write to all items in your site. Activation of this feature is necessary for the App Step to become available for use in SharePoint Designer 2013: 6) Create the workflow in SharePoint Designer 2013 associated with the Comments List. Be sure to select SharePoint 2013 workflow platform when setting up the workflow: 7) Set the workflow to start automatically when an item is created. You can change this setting in SharePoint Designer on the 'View and manage settings for this workflow' page: Step 1) Select App Step located in the Workflow Tab of the ribbon: Any actions you now place within this App Step can read from and write to all items in the site. Step 2) Add an action within the App Step to 'Create New List Item' in the secured items list from the list item just submitted. Note: The action to 'Copy List Item' available on the SharePoint 2012 workflow platform is also no longer available for use. 'Create New List Item' is actually a better choice though since this allows us to map the 'Created By' field to the 'Submitted By' field in the Secured Comments List: The reason the 'Submitted By' field comes in handy is because this step of the workflow is running under the workflow app permission, therefore the 'App Created By' field of the entry in the Secured Comments list will show 'Workflow'. By setting the 'Submitted By' field to 'Created By', we are easily able to capture the name of the user that submitted the new comment: Step 3) Add a step to delete the list item in the Comments List. Because the initiator does have access to the "Current Item" which is the Comments list, this action of the workflow could be taken out of the App Step and placed in a step of it's own. All that is left to do now is publish your workflow and test it out. Note that you will receive a message that states 'By publishing this workflow, conditions and actions inside App Steps will run using only application credentials. Only continue if this is the intended behavior.' Select OK. That's really all there is to it. You can then simply setup an alert on your Secured Comments list to notify site owners when new comments are submitted. As you can see the workflow is very simple and easy to implement! I hope this helps someone out. I've googled this scenario several times and seem to find all kinds of suggestions to implement this, but to me this appears to be the most straight-forward and it works as expected. Please feel free to leave any comments. I almost forgot! For anyone used to using the Impersonation Step on the SharePoint 2012 platform, I wanted to explain why I decided using the new App Step was the best choice. The one drawback of using an Impersonation Step is that the workflow could suddenly stop working if anything were to happen to the user account that created and published the workflow. The purpose of the Impersonation Step is to run any actions inside this step as the user who authored the workflow. If the account that creates and publishes the workflow is edited in some way, possibly with a permission change on the site or a password change, then you have a broken workflow! If choosing to use an Impersonation Step, you should always be sure to use an account specifically set up for this purpose. In addition to this issue is the fact that this action is now deprecated…likely a clue that building a workflow specifically for SharePoint 2013 is going to hang around longer than one built on the SharePoint 2012 platform. So in conclusion, when creating a workflow in SharePoint 2013 that requires elevated privileges, the App Step (which has read/write permissions to all items in the site) is a much better option and just as easy to implement. Thanks for reading!
Why even use an App Step/Elevated Permissions for your Workflow?
My Example Scenario
The Issue
Summary of the Solution
The Solution Step by Step:


Workflow Creation Step by Step:


The completed workflow:
How To Use App Step In Sharepoint Designer 2013
Source: https://info.summit7.us/blog/app-step-or-impersonation-step-in-sharepoint-designer-2013
Posted by: joneshany1989.blogspot.com
0 Response to "How To Use App Step In Sharepoint Designer 2013"
Post a Comment