

How to use Clipboard history on Windows 11
On Windows 11, the Clipboard history is a characteristic that extends the functionality of the traditional Clipboard functionality. It does this by adding an interface that records the things you copy (text and images), which yous tin can open to paste the content every bit needed. You can organize the contents for quick admission to frequent items. And information technology can upload the items to the cloud and sync them across all your devices linked to the same Microsoft account.
The only caveat is that this is an optional feature that you lot must enable and configure manually through the Settings app.
In this Windows xi guide, we will walk you through the steps to enable, configure, and use the Clipboard history feature across your devices.
- How to enable Clipboard history on Windows 11
- How to sync Clipboard history on Windows 11
- How to employ Clipboard history on Windows xi
- How to clear Clipboard history on Windows eleven
- How to disable Clipboard history on Windows 11
How to enable Clipboard history on Windows 11
You can enable the Clipboard history in two ways, including using the Settings app or emoji panel.
Enable Clipboard from Settings
To enable Clipboard history through the Settings app, utilise these steps:
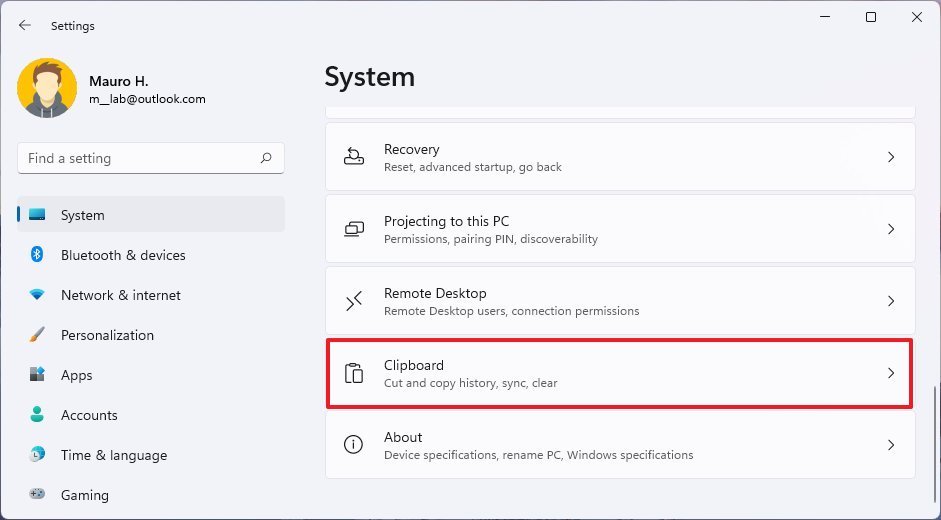
- Open Settings.
- Click on Arrangement.
-
Click the Clipboard page on the correct side.
 Source: Windows Central
 -
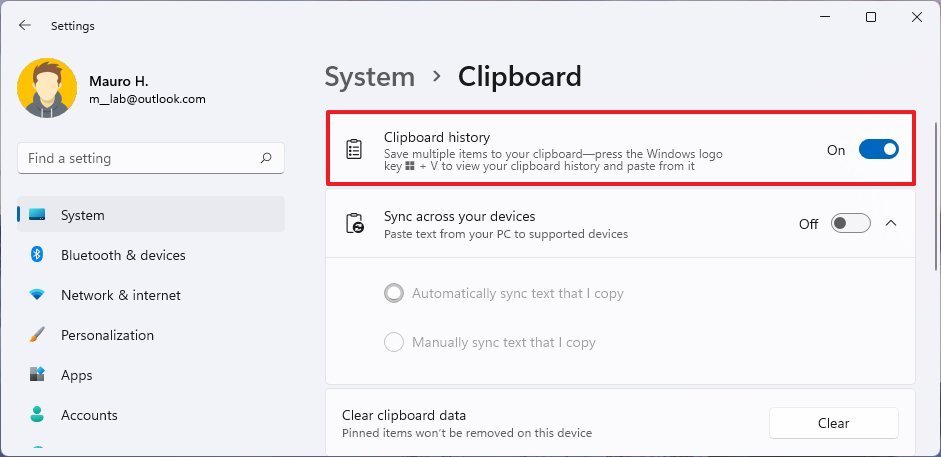
Turn on the Clipboard history toggle switch.
 Source: Windows Cardinal


Once y'all complete the steps, you tin can start copying and pasting as earlier, with an added interface to manage the contents you copied.
Enable Clipboard from emoji console
To enable Clipboard history through the emoji panel, utilise these steps:
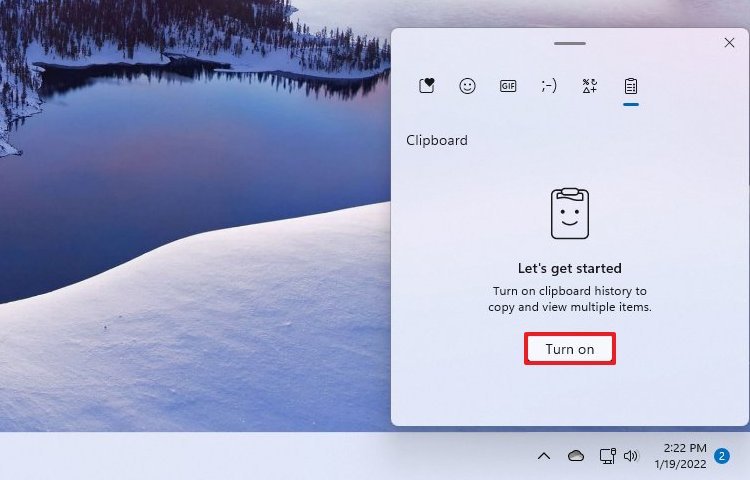
- Invoke the Windows key + 5 keyboard shortcut.
-
Click the Turn on button.
 Source: Windows Central

Since the Clipboard history is part of the emoji console, you can besides access the feature using the Windows key + ; or Windows primal + . keyboard shortcuts and opening the "Clipboard" tab.
How to sync Clipboard history on Windows eleven
On Windows xi, when you enable Clipboard history, you tin also configure the feature to upload and sync the contents you copied across your devices linked with the Microsoft business relationship, including those still on Windows 10.
To sync the content history to the cloud and across devices, use these steps:
- Open Settings.
- Click on System.
-
Click the Clipboard page on the correct side.
Source: Windows Central -
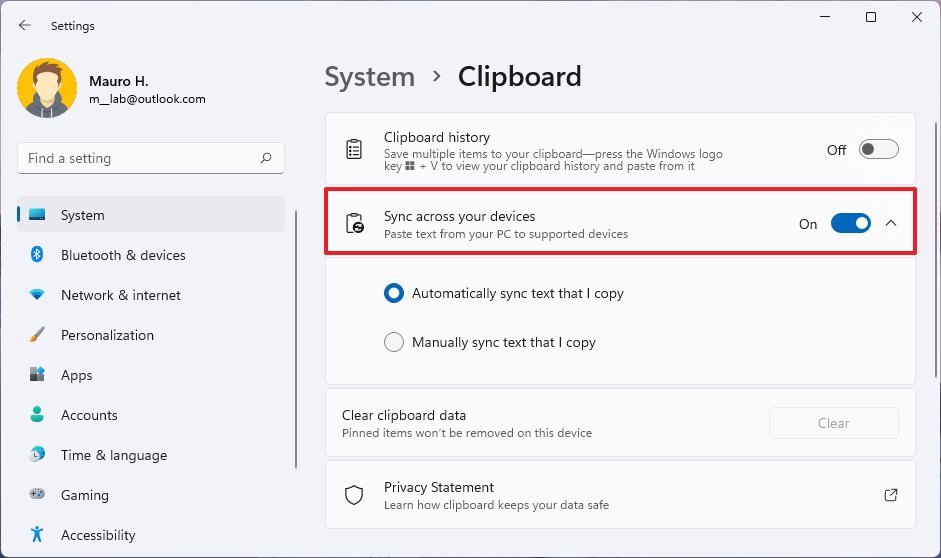
Turn on the Sync across your devices toggle switch.
 Source: Windows Central
 -
Select the sync choice to use with the Clipboard:
- Automatically sync text that I copy — The Clipboard history will sync to the cloud and across your computers linked with the aforementioned Microsoft account.
- Never automatically sync text that I copy — You take to select the contents to upload to the cloud to make them available across devices.

Subsequently you lot complete the steps, the items stored in the Clipboard history will sync across your devices, allowing you to paste text and images that yous copied on other devices.
How to use Clipboard history on Windows 11
The Clipboard history works similarly to the classic experience. The just departure is the interface that lets you lot review and manage the stored content. Also, if you lot choose the sync choice, you lot will be able to paste text and images that you uploaded to the Clipboard beyond devices.
On Windows eleven, when the characteristic has been enabled, you lot can continue to use the Ctrl + C keyboard shortcut to copy and the Ctrl + V keyboard shortcut to paste whatever you stored in the history. You can practice the same using the context menu or the command bar in File Explorer.
Yet, ane more addition is the Windows key + V keyboard shortcut that opens the emoji panel (in the "Clipboard" tab) to view the listing of items copied from other applications, such as Microsoft Edge, Word, OneNote, Notepad, and others.
Copy and paste with Clipboard
To re-create and paste content with this feature, use these steps:
- Open an app.
-
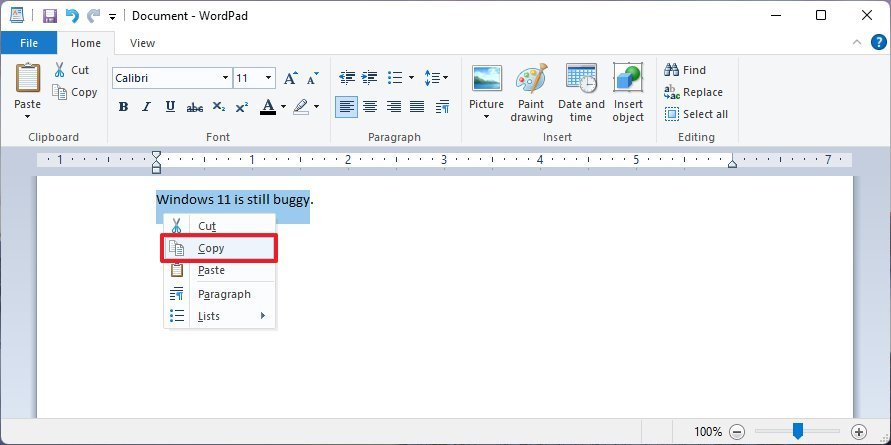
Select the text or image.
Quick note: Clipboard history only supports copying images from certain applications, such as the Snipping Tool. You can't re-create paradigm files (for case, .jpg) to the Clipboard history. Still, you can still copy and paste files as usual; they just won't announced in the history interface.
-
Right-click the selection and cull the Re-create (or Cutting) option.
 Source: Windows Primal
 - Switch to the app to paste the content.
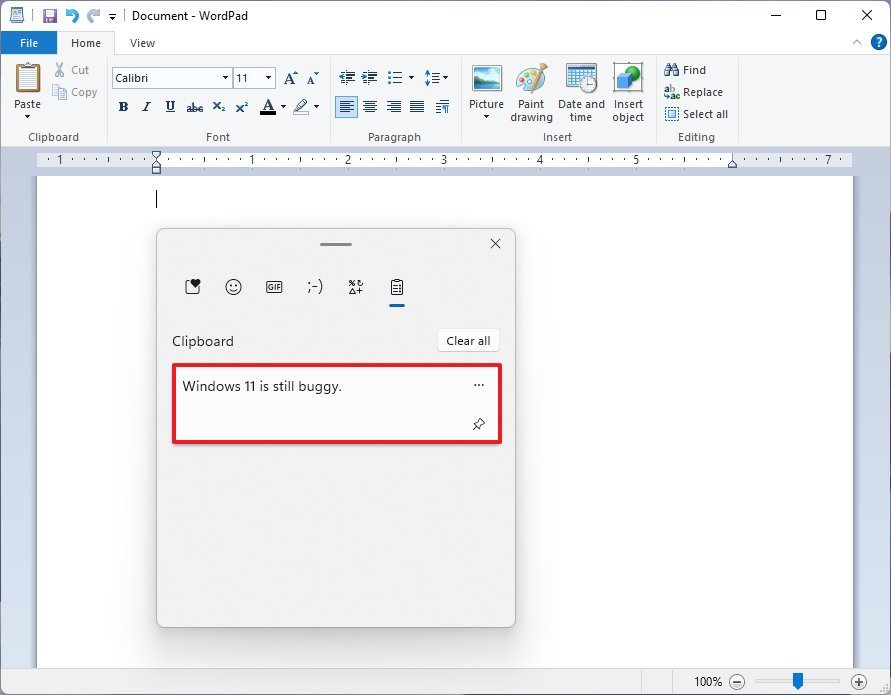
- Invoke the Windows key + 5 keyboard shortcut.
-
If you lot want to paste the content equally is, select the item to paste information technology.
 Source: Windows Primal
 -
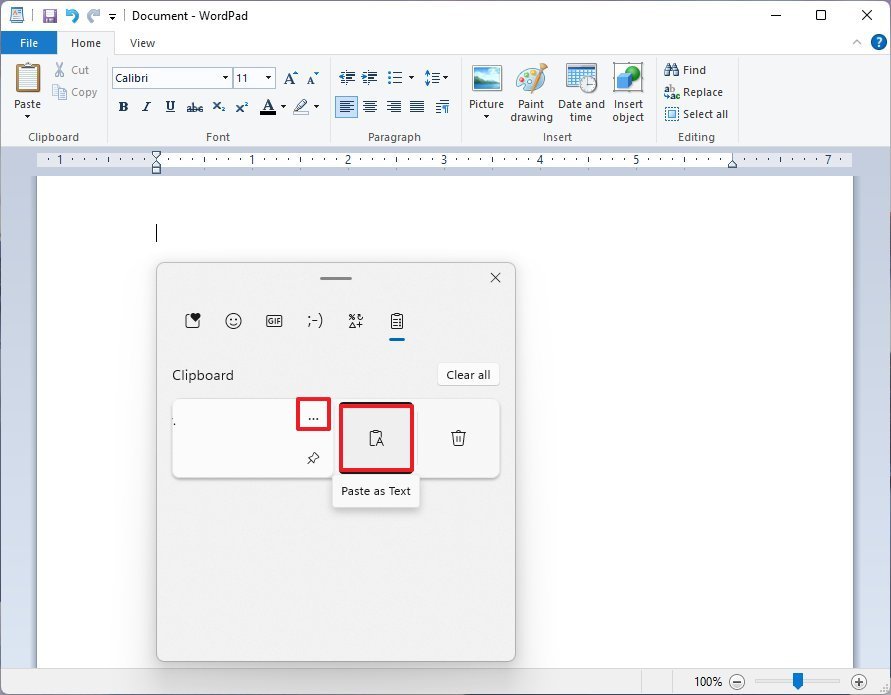
If yous want to paste equally text without formatting from the source, click the Run into more (iii-dotted) carte and click the Paste every bit Text option.
 Source: Windows Central


In one case y'all complete the steps, the text or image will announced in the application, depending on your output selection.
Manage items in Clipboard
To manage items in the history, utilize these steps:
- Invoke the Windows central + V keyboard shortcut.
-
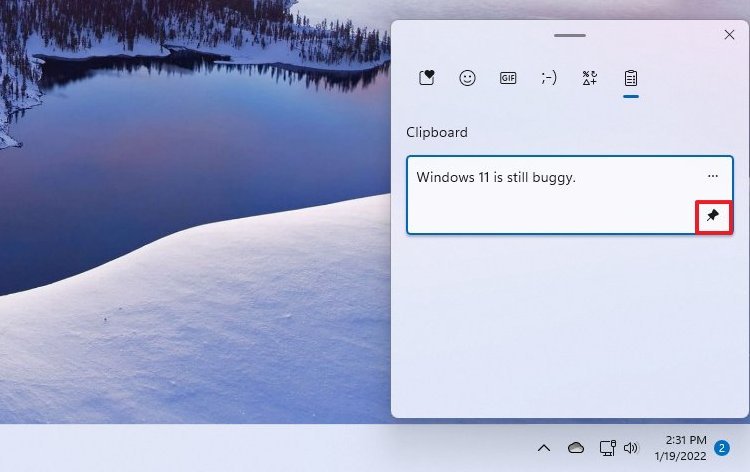
Click the Pin button for faster admission to content you use frequently.
 Source: Windows Central
 -
Click the Run across more (three-dotted) menu button and click the Delete option to remove the items from the history.
 Source: Windows Central


After you lot consummate the steps, the text or epitome volition no longer exist available in the history.
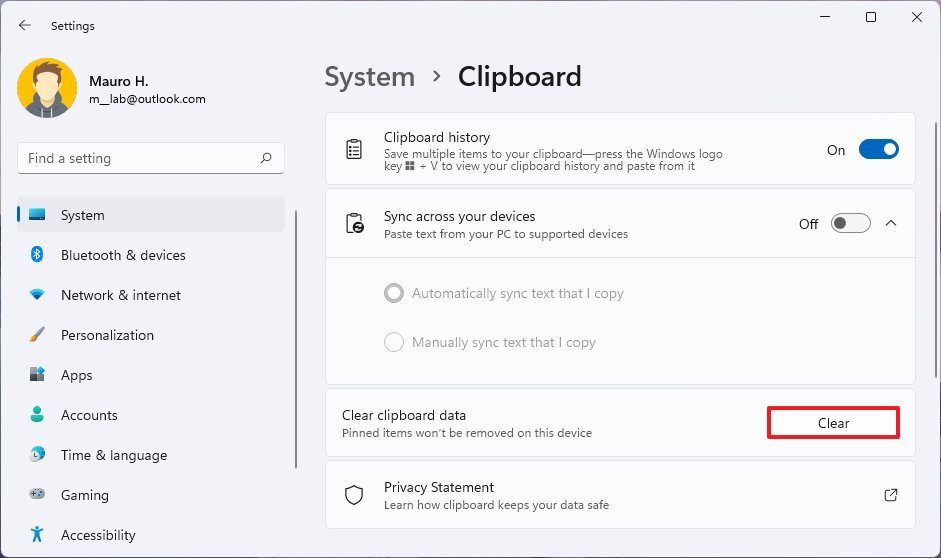
How to articulate Clipboard history on Windows 11
To delete all the items in the history (excluding pinned items), use these steps:
- Open up Settings.
- Click on System.
-
Click the Clipboard page on the right side.
Source: Windows Central -
Click the Clear push button for the "Articulate clipboard data" setting.
 Source: Windows Primal

One time you complete the steps, the history volition articulate on your device, except pinned items.
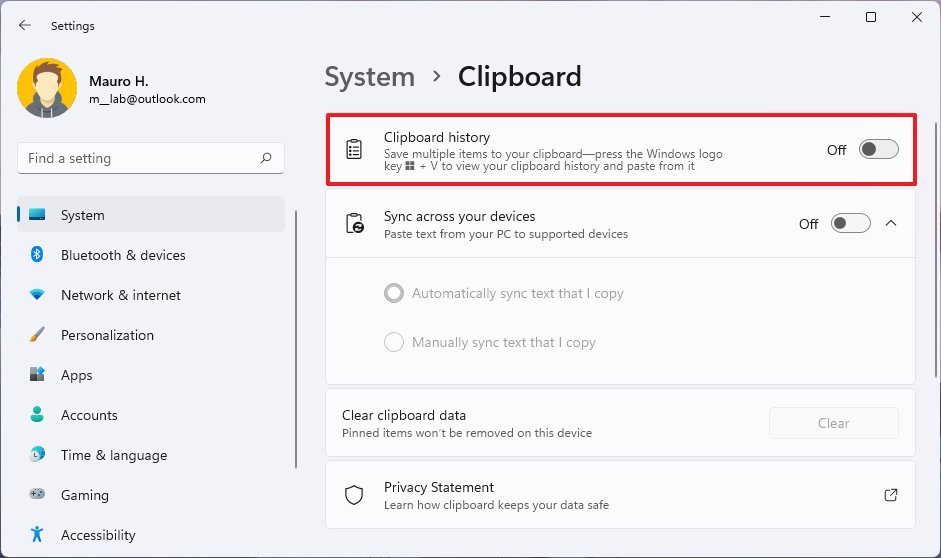
How to disable Clipboard history on Windows 11
To disable the Clipboard history on Windows 11, apply these steps:
- Open Settings.
- Click on System.
-
Click the Clipboard page on the right side.
Source: Windows Cardinal -
Turn off the Clipboard history toggle switch.
 Source: Windows Central

Afterward you complete the steps, y'all will still exist able to re-create and paste as earlier, but you won't take access to the history, and the contents won't sync beyond devices.
More than Windows resource
For more helpful articles, coverage, and answers to common questions most Windows 10 and Windows 11, visit the following resources:
- Windows 11 on Windows Key — All you need to know
- Windows 11 assist, tips, and tricks
- Windows 10 on Windows Central — All you demand to know

Source: https://www.windowscentral.com/how-use-clipboard-history-windows-11
Posted by: joneshany1989.blogspot.com
0 Response to "How to use Clipboard history on Windows 11"
Post a Comment